Rants, Raves and Revelations
by Harry {doc} Babad
Annotating and Making Text Recipes Pretty – It takes more than one tool
As many of you know, I have a long-standing hobby, collecting recipes. Being slightly overweight (lies, all lies) and with the children having flown the coup, we don’t cook much anymore, but the recipes are fun. From my past articles and occasional recipe management software reviews, you will remember that there are two ways to collect and organize recipes:
1) You can store your recipe in a database using software such as the excellent TheRecipeManager [reviewed macC December 2005]. The good thing about this method is that you have all the benefits of a well-designed database that can be used to retrieve just the recipe you want from you collection of thousands. The bad things about this are (1) entering a recipe is an extra step, easy to do, but an extra step; and the (2) collection is harder to share with friends. In any case, in order to input your recipe to the software, it must be in text form, scanned and OCR’d if necessary.
2) A second alternative, one which I’ve been doing for years, is to either download a recipe or alternatively scan and OCR it from a hard copy. The new recipe can be stored in a well-organized hierarchy of nested folders in either PDF (my preferred graphic format for recipes) or as word-processed text. Such collections can be burned to a CD and shared with special friends. [Remember, much of this stuff is copywrited, so follow the rules when sharing.] I’ve talked about the limitations of organizing recipes by folder in my March 2005 macC 3Rs article In Search of Perfect Recipe and Cooking Software.
In this 3Rs column, I’ll share my experiences, for the pure joy of it, in turning simple text recipes into pretty illustrated and annotated PDF files. Now I don’t do this prettification for every recipe, but it’s fun to do for those special recipes. Comparable things can be done if your preferred recipe end state is a MS Word document, but most of you already know how to add graphics and supplemental text to a word processing document, se we won’t go over that again.
What You Will Need In Order to Play
A Recipe in PDF Format — One that was downloaded, not scanned from a book. If you scan a book, than convert the recipe to a text file with either Acrobat or software such as ReadIris 11 [macC, January 2006]. It is possible to modify a “pure” graphics file, but I find it easier to work with text, especially when wanting to add both a picture of the finished recipe and perhaps some comments by way of background information.
A Picture of the Cooked Recipe — These at times are available in a book or on a recipe card. To capture them, scan them to JPEG in color at about 200 dpi. Alternatively, check the to see if the found recipe came with an illustration. If so, capture it, by drop and drag, to your desktop. When a picture doesn’t accompany the recipe, I can often find good recipe illustrations on Google Images or by using Beholder http://www.mesadynamics.com/beholder.htm, [reviewed macC March 2003.]
Collect and Format Any Clarifying or Background (Text or RTF) Not in Your Scanned Recipe — Raita, I need a definition — I went to http://www.epicurious.com/cooking/how_to/food_dictionary/, a great place to find out the meaning of food terms and I captured the following as a clipping file:
Raita [RI-tah] YOGURT salads popular in India, raitas are a combination of thick, whole-milk yogurt and various chopped vegetables like cucumbers, eggplant, potatoes or spinach, or fruits such as bananas or tomatoes. These salads are variously seasoned with black mustard seeds, GARAM MASALA and herbs such as chervil, coriander, cumin, dill, mint, parsley or tarragon. Raitas are designed to be a cooling counterbalance for many spicy Indian dishes.
© Copyright Barron's Educational Services, Inc. 1995 based on THE FOOD LOVER'S COMPANION, 2nd edition, by Sharon Tyler Herbst.
Let’s Pretty Up the Recipe
 The
recipe I’m going to use to illustrate the process is for Cool Cucumber Raita created by Master Chef
Tyler Florence which I copied from the following Food TV link: http://www.foodnetwork.com/food/recipes/recipe/0,,FOOD_9936_28790,00.html.
The
recipe I’m going to use to illustrate the process is for Cool Cucumber Raita created by Master Chef
Tyler Florence which I copied from the following Food TV link: http://www.foodnetwork.com/food/recipes/recipe/0,,FOOD_9936_28790,00.html.
The recipe as posted, contains all sorts of extraneous material, but its Food Network page contains an option to go to a full page version containing no additional sponsor information. Also, notice that the recipe itself is spread over two pages, of which I only show the first.
If you wanted to use MS Word as a basis for storing recipes, you could, in Acrobat, grab [use the select tool] the parts you wanted and paste them sequentially into Word. Such a document would be your starting point for recipe gentrification.
Instead of Word, I downloaded the Full Page Version by printing to PDF.
Note: When in the Full Page Version, I have Safari make the text large. It’s easier on my eyes and will translate to enlarged text in my mostly plain text recipe.
Please note the position of the Food Network Icon, the dead space after the copyright notice and the lack of both a recipe illustration and a definition of Raita. These are things we’re going to change.
Tuning Up the PDF Text File
 First, let’s move the
footer line http://www.foodnetwork.com/food/recipes/recipe/0,FOOD_9936_28790,00.html
Page 1 of 2 to kill the dead space.
First, let’s move the
footer line http://www.foodnetwork.com/food/recipes/recipe/0,FOOD_9936_28790,00.html
Page 1 of 2 to kill the dead space.
Dealing With Dead Space — Open the PFD File in Acrobat and select the Touch up objects tool [tools > Advanced Editing > Touch Up Objects tool]. [1] Select and copy the desired text to your clipboard. [2] Then past the text into the body of the recipe — no I can’t control its location, but don’t fret, it’s not a problem. [3] Select the newly pasted text and move it to the location you desire. Save the file! [4] Return to the text on the bottom of the page, select it and then backspace to delete it.
There’s still some unneeded space on the bottom of the page and we could use Acrobat’s Crop pages tool [Document > Crop Pages] to eliminate it. Let’s wait to do that to see if we’ll need that space as we add both a graphic and the definition of Raita. We can always copy the PDF if desired.
Adding a Graphic — This particular recipe did not come with a picture of the cooked dish. Few you want to download do. I searched Google Images to see what would turn up and found an image that pleased. I followed the link to a larger version of the thumbnail and dragged the image to my desktop. I was getting closer to my goal. In the Acrobat version of the text recipe, I was ready to add the graphic.
I
know how to drop-and-drag and external graphic into a PDF file, but when I
opened the image using GraphicConverter (my favorite graphics tool), I was able
to copy it to the 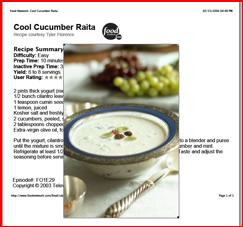 clipboard. I selected
the hand tool in Acrobat, and then pasted the clipboard image into my recipe document. Again,
the software has a mind of its own and the image was both in the wrong place
and covered up some of the text. No matter! Grab the image, and then one of its
corners. Shrink the image to the size you want. Note that unlike MSW (Microsoft
Word), images in Acrobat can only be resized on the diagonal Save! Then
continuing to use the hand tool, move the image to the location you want. As
you’ll see at the end of the article, I move the picture to the top right hand
section of the recipe opposite the title and recipe summary. Wasn’t that easy?
clipboard. I selected
the hand tool in Acrobat, and then pasted the clipboard image into my recipe document. Again,
the software has a mind of its own and the image was both in the wrong place
and covered up some of the text. No matter! Grab the image, and then one of its
corners. Shrink the image to the size you want. Note that unlike MSW (Microsoft
Word), images in Acrobat can only be resized on the diagonal Save! Then
continuing to use the hand tool, move the image to the location you want. As
you’ll see at the end of the article, I move the picture to the top right hand
section of the recipe opposite the title and recipe summary. Wasn’t that easy?
Now the Added Text - So how can I place the definition I’d earlier collected, into the empty space I left at the bottom of my now illustrated recipe? Since I’ve never been able to figure out, even using the manual, and books I’ve reviewed, how to add new text to a PDF file In Adobe Acrobat, I turned to PDFpen Pro [macCompanion Review, July 2005] to get the job done.
In Acrobat, the text field, text touchup, or touch up reading order tools worked to add NEW text to my recipe document. Am I missing something?
I dropped the Acrobat file onto the PDFpen Pro application icon and opened my recipe document in that application. I then pasted my definition clipping into the blank space at the bottom. After a bit of sizing, using the handles at the corner of the newly placed text box (Raita definition), I had the text where it belonged.
There are a few peculiarities about this operation. First, the image you’ve work so hard to place is not visible in PDFpen Pro. Second, the bottom line of the text file (footer) you deleted earlier, as well as the line moved still shows up in the PDFpen Pro window. Ignore those artifacts; just place the new test where it needs to appear. Save the file. Then reopen it up in Acrobat. Wonder of wonders, your image is back! Get rid of the extraneous footer with the touch up object tool.
I could have worked with the new text either in PDFpen Pro or MS Word to optimize its size, before pasting it into the recipe, but got lazy. Folks, there are a number of excellent tools in PDFpen Pro for otherwise manipulating text in a PDF file, but that’s another story.
After Thoughts
In 20-20 hindsight, it probably takes fewer steps to first introduce the extra text using PDFpen by changing the order of the steps, but I usually only add an image to my text files, so I’m leaving the order of the steps as-is. Namely, I] Tune the text Copy. [II] Add a selected photo of the recipe. Finally [III], add any supplemental text using PDFpen Pro.
And the result is…

Enjoy!
doc_Babad