Übercaster 1.0
Reviewed by Wayne Lefevre
Übercaster version 1.0 $79 USD, $89 CND, £39 UK System Requirements: Mac OS X 10.4.4 or later; Universal binary. Strengths: Ability to use templates, Record interview live with iChat, Skype, Gizmo, Record audio live, stealth mode, One click encoding and uploading. |
|
Weaknesses: No loops, stingers, bumpers, or any audio included. For a demo of this product: http://www.ubercaster.com/download.shtml |
|

Introduction
Übercaster has recently just come out of beta. Version 1.0 was finally released just after we went to press for the April issue, and so far its been a very smooth, and for the most part, bug free release. For those who have never heard of Übercaster before, it is podcasting producing software, pure and simple. In the words on their website, Leave your garage and feel at home. Übercaster has been made with podcaster's needs in mind. With its versatile options you may record your show the way you're used to and profit from Übercaster's advanced cut and release tools. But you may also take advantage of Übercaster's ground breaking live audio recording. Auto ducking, effects, chapters for enhanced podcasts, ID3 tags, album cover art, mp3/AAC/AIFF encoding - you name it. It's all there. Seamlessly integrated.
Getting Started
Installation was simple with a normal drag and drop into the Applications folder. It comes with an easy to read PDF for the installation of the other folder it comes with, an Extras Folder. The Extras folder containes the PleasantConnect installer package that installs Übercaster’s drivers for recording Skype, iChat and Gizmo. It also gives you the option to install Smart Crash Reports from Unsanity, and sample AppleScripts.
Using the Software
I’ve been using Übercaster for several months, and was impressed with it the first time I used it. It’s really like no other podcasting software out there, no matter what the cost.
First things first. I would suggest, since it is different than other podcasting software, to visit Übercaster website and watch at least the first, if not all, the available screencasts. Even if you wind up not using the application, they are well done and will teach you a lot about the product, and it will very quickly get you up to speed on the new type of workflow.
Speaking of a new type of workflow, there are four main sections of Übercaster. The first part is the preparation layer. You are basically presented with a blank slate, with nothing but a microphone panel. On this layer you can organize your whole podcast. In the mic panel, you select which microphone you would like to use, enter a custom title, color and keyboard shortcut. Switching to the Audio button you control your mics gain, pan, and channel. Here is where you also can select to monitor your output. By switching to Effects, you can select to Enhance the mic. Though the enhancement the mic goes through is pretty much shrouded in mystery, it can be controlled with a slider and obviously has to do with compression, gain, gating, reverb maybe and other bits of magic. You can also apply any number of standard AU plug in options.
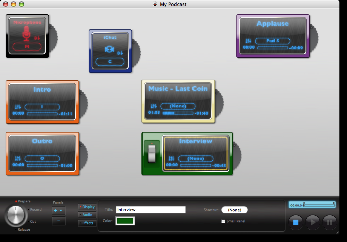 For your podcast you
might have some intro music, an interview, some comments and some outro music.
It now becomes as simple as dragging and dropping each clip onto your blank
“palette.” Each audio clip becomes it’s own selectable panel, each with it’s
own gain control, hot key and assignable effects. The effects are especially
cool because you have the ability to “switch” them on and off, literally on the
fly. You can control the start, end, and duration as well as if it loops or
not. By selecting each panel, you can add whether it auto ducks, and if it’s
the master or slave. The auto ducking is genius, it actually lets you select
the amount of gain you want the music to decrease. It doesn’t sound like much,
but after using GarageBand, I’ve always had to go back in and adjust the volume
because I never thought GarageBand decreased the volume enough. In the
preferences, you can now input the percentage of decrease, and it works like a
dream. I’m personally fond of 70% with a medium sensitivity and low gap
tolerance. Now that you have everything set up, turn the select knob to Record.
For your podcast you
might have some intro music, an interview, some comments and some outro music.
It now becomes as simple as dragging and dropping each clip onto your blank
“palette.” Each audio clip becomes it’s own selectable panel, each with it’s
own gain control, hot key and assignable effects. The effects are especially
cool because you have the ability to “switch” them on and off, literally on the
fly. You can control the start, end, and duration as well as if it loops or
not. By selecting each panel, you can add whether it auto ducks, and if it’s
the master or slave. The auto ducking is genius, it actually lets you select
the amount of gain you want the music to decrease. It doesn’t sound like much,
but after using GarageBand, I’ve always had to go back in and adjust the volume
because I never thought GarageBand decreased the volume enough. In the
preferences, you can now input the percentage of decrease, and it works like a
dream. I’m personally fond of 70% with a medium sensitivity and low gap
tolerance. Now that you have everything set up, turn the select knob to Record.
 There’s not much
difference in the look between Prepare and Record. You have all your audio
panels set up, there is a button for Record, Stop, Play and Pause. The Record
button highlights when you start recording. You’ve got your standard dB meters
with clipping lights, a master gain control, and a small recording monitor not
made but for the simplest of editing. If you belong to the school of recording
that uses very little, if any, post production, than this is definitely your
product. Clicking on the mic panel, selecting the hot key, or, if you have the
“stealth” option on so you don’t hear any mouse clicks during your cast by
hovering the cursor over the mic selection for a few seconds, will start a
3-2-1-Record countdown and your off. If you want to play other clips you select
them in the same way. If you want your voice to have a deep reverb in the
middle of a sentence, you can just assign that effect to a virtual switch on
your microphone panel, then just switch it on and off at the appropriate times.
When a clip is almost completed, the panel will start flashing to give you time
to get ready for the next segment.
There’s not much
difference in the look between Prepare and Record. You have all your audio
panels set up, there is a button for Record, Stop, Play and Pause. The Record
button highlights when you start recording. You’ve got your standard dB meters
with clipping lights, a master gain control, and a small recording monitor not
made but for the simplest of editing. If you belong to the school of recording
that uses very little, if any, post production, than this is definitely your
product. Clicking on the mic panel, selecting the hot key, or, if you have the
“stealth” option on so you don’t hear any mouse clicks during your cast by
hovering the cursor over the mic selection for a few seconds, will start a
3-2-1-Record countdown and your off. If you want to play other clips you select
them in the same way. If you want your voice to have a deep reverb in the
middle of a sentence, you can just assign that effect to a virtual switch on
your microphone panel, then just switch it on and off at the appropriate times.
When a clip is almost completed, the panel will start flashing to give you time
to get ready for the next segment.
 The next step on our
dial is Cut. When selected, it starts looking like other podcasting software
does. All your tracks are laid out on the top part of the edit window. Each
selectable track has four buttons on it for soloing, muting, editing the volume
track, and effects, to display and edit switch able effects. The lower half of
your edit window you can edit 4 separate sets. There is a Track Edit, where you
select one track, edit the name, AU effects, etc. Pretty much a large version
of the top. The Source view shows all source material of a selected track in
the cut view. The source material will always be shown in full length in source
view. You can select in and out points by dragging markers in this view. The
next view is Media View, that looks similar to the Source view. The main
difference is which audio material is showed: While the Track source view shows
the source material of a selected track in the cut view, the Media view shows
all used and unused audio material in the whole document. The last view to
select is Chapters. Here is where you can take care of all the enhanced
podcasts pictures, chapter titles, URLs and the like. One of the biggest
features that I really like is the sound graphical line lays on top of your
track, so if you change the volume with the volume line, you can move your
track around, and the volume adjustments follow!
The next step on our
dial is Cut. When selected, it starts looking like other podcasting software
does. All your tracks are laid out on the top part of the edit window. Each
selectable track has four buttons on it for soloing, muting, editing the volume
track, and effects, to display and edit switch able effects. The lower half of
your edit window you can edit 4 separate sets. There is a Track Edit, where you
select one track, edit the name, AU effects, etc. Pretty much a large version
of the top. The Source view shows all source material of a selected track in
the cut view. The source material will always be shown in full length in source
view. You can select in and out points by dragging markers in this view. The
next view is Media View, that looks similar to the Source view. The main
difference is which audio material is showed: While the Track source view shows
the source material of a selected track in the cut view, the Media view shows
all used and unused audio material in the whole document. The last view to
select is Chapters. Here is where you can take care of all the enhanced
podcasts pictures, chapter titles, URLs and the like. One of the biggest
features that I really like is the sound graphical line lays on top of your
track, so if you change the volume with the volume line, you can move your
track around, and the volume adjustments follow!
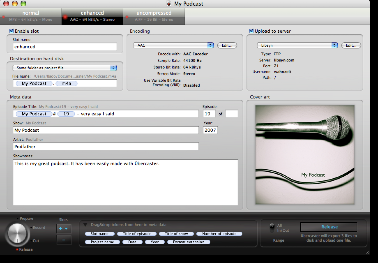 The last button on our
big silver selector dial is Release, and here Übercaster shines. First it’s
where you place all your normal meta data, cover art, titles, etc. The big
difference is the ability to create many slots. A slot is your podcast, the
name you assign to it, it’s destination and encoding. You can even have it
upload directly to an ftp server. This information can all stay the same
podcast after podcast. Say, you want an mp3 version to go to your .Mac account,
an enhanced AAC version to go to your podcasting server, and an AIFF version to
be stored on your backup drive. After creating a separate slot for each of the
encoded versions, all you need to do is press Release, and Übercaster will do
the rest. It will mixdown your podcast, encode all three versions and upload
each respective version to the .Mac account, the ftp server, and save the third
on your hard disk. All with one press of a button.
The last button on our
big silver selector dial is Release, and here Übercaster shines. First it’s
where you place all your normal meta data, cover art, titles, etc. The big
difference is the ability to create many slots. A slot is your podcast, the
name you assign to it, it’s destination and encoding. You can even have it
upload directly to an ftp server. This information can all stay the same
podcast after podcast. Say, you want an mp3 version to go to your .Mac account,
an enhanced AAC version to go to your podcasting server, and an AIFF version to
be stored on your backup drive. After creating a separate slot for each of the
encoded versions, all you need to do is press Release, and Übercaster will do
the rest. It will mixdown your podcast, encode all three versions and upload
each respective version to the .Mac account, the ftp server, and save the third
on your hard disk. All with one press of a button.
Conclusion
As you can probably tell by now, I am a big fan of Übercaster. There has been some talk in the community that its $79 price tag is too high. I think that the price is fair, especially if you podcast on a regular basis. The time saved alone is worth the cost. This argument is one of the poorest I’ve seen yet, for there is always freeware that does what another program does for monetary compensation for the developer. If you try the program out and don’t want to pay the $79, by all means, go back to using Audacity for free. I personally think that Übercaster is worth the money. It’s a polished, professional application that only does podcasting, and does it extremely well.
There is a timed try–out version that gives you the opportunity to record one full length podcast, and some 5 minute versions that puts a wonderful sounding jingle at the end. Really, the jingle is top notch and sounds great. Once your past the very shallow learning curve, you’ll wonder how you ever podcasted with the archaic software that is out now.