Doc_Babad's Macintosh Tips - A Macintosh Tip or Three…By Harry {doc} BabadProduct and company names and logos in this review may be registered trademarks of their respective companies. The software related tips were tested on a 1 GHz dual processor PowerPC G4 Macintosh with 2 GB DDR SDRAM; running under Macintosh OS X OS X 10.4.8. |
|

This month I continue sharing my occasional tip related finds with you. A few tips I share come from —Paul Taylor's Hints&Tips column http://www.mac-hints-tips.com and are used with his permission. Where I use any one else’s tips for this column, I acknowledge both their source and their contributors.
Oh, I almost forgot! Unless otherwise noted, all the tips and tidbits I share, where appropriate, work on my computer. If I don't own the software but if the tip sounds interesting, I'll so note at the end of that specific write-up.
Tips I’ve provided this month, as always in a random order, include:
· Read the Manual
- Stop Squinting at Tiny Text
· A Screen Image Trick or Two: History of capturing screen on a Macintosh
· Exchanging Recipes with Another TheRecipeManager User
- Internet Shopping — Keep Your Receipts
· Destroying or Over Burning CD/DVDs >– Flattening Warped LP’s
· Make Pasted Text Match in MS Word 2004
- More Easily Save Document Images in MS Word 2004
- What To Do With Your Previously Installed Operating System
- URL Contraction and Linking in
MS Word
Managing Your Widgets
§ § § § § § § § § § § § § § § § § §
Read the Manual — Most Mac users never read a manual. It’s true! After you’ve used a program for six months or a year, and you think you know all that it can do, surprise yourself by taking a look at the manual. Read the chapter headings. Maybe even read some of the text. I’ll bet you find at least several things that your favorite program can do that you never even thought about before! Get new features without spending a single dollar. — Yes, it’s always a great surprise to find an answer to a current need in a manual I’ve long neglected. My favorite software books also serve that purpose.
MacInTalk,
Nashville, TN from
Paul Taylor's Hints&Tips column January 2007
§ § § § § § § § § § § § § § § § § §
![]() Stop Squinting at Tiny Text - Many Web sites designed to display in Internet Explorer for Windows use tiny
font sizes, but there's no need to squint. In all Mac Web browsers (except
Opera Software's Opera), you can press ?-=
(equal sign) to increase the text size. If the text gets too big, press ?-hyphen (-) to shrink it again.” In
FireFox use the ?-shift-+
(plus), which also works in Safari. In Safari of cause you can grow or shrink
page content by using the toolbar’s A or
A buttons.
Stop Squinting at Tiny Text - Many Web sites designed to display in Internet Explorer for Windows use tiny
font sizes, but there's no need to squint. In all Mac Web browsers (except
Opera Software's Opera), you can press ?-=
(equal sign) to increase the text size. If the text gets too big, press ?-hyphen (-) to shrink it again.” In
FireFox use the ?-shift-+
(plus), which also works in Safari. In Safari of cause you can grow or shrink
page content by using the toolbar’s A or
A buttons.
Thanks
to - Adam C. Engst, Modified from Surfing Hints Surf Smarter,
MACWORLD October 2006.
§ § § § § § § § § § § § § § § § § §
Simplify Your Dock — Many people
clutter their Docks with applications, but aren’t aware that you can reduce
this clutter by instead placing folders containing application aliases in the
Dock. You can then access any of those applications by holding your mouse
button on the folder icon in the Dock. Try this: create a new folder in a handy ![]() location, and then fill it full of aliases to
applications you often use. Or make several folders to categorize your
applications. Drag those folders to your Dock.
location, and then fill it full of aliases to
applications you often use. Or make several folders to categorize your
applications. Drag those folders to your Dock.
You can then access any of those applications by just holding your mouse button down on its folder in the Dock. A list of the aliases in that folder will appear, from which you can choose an application to launch. (You can also drag a document onto one of those icons to open it.) When you’re happy with your Dock folders, remove the old application icons from your Dock by just dragging them off of it.
Design Tools Monthlyhttp://www.design-tools.com
From Paul Taylor's Hints&Tips column January 2007
PS: You can also add folders to Unsanity’s fine Fruit Menu items haxie http://unsanity.com/haxies/fruitmenu or to Devon Technologies X-Menu http://www.devon-technologies.com/products/freeware/, both of which we’ve reviewed for macC.
doc_Babad
§ § § § § § § § § § § § § § § § § §
A Screen Image Trick or Two: History of capturing screen on a Macintosh — The Macintosh has always had the ability to take high-quality screenshots without the need of any additional third-party software. However, Apple has long controlled the format of the resulting picture, along with where it ends up on disk. This has meant that, when Apple decided to change any of these settings, there wasn't much that could be done about it. For example, when OS X came around, the format of a screenshot changed from PICT to PDF. More recently, with the arrival of Tiger, Apple changed the format from PDF to PNG. You all likely know that in the finder, the command-shift – 4 key combinations provide you with cross hairs that allows you to select which part of the screen to capture. As you will see in what follows there’s a lot more freedom that you thing available to enable screen shots the way you want them to me.
You’re also likely aware that Apples’ Grab.app provides a more sophisticated set of options for screen capture. Selection, window, whole screen or timed. That is you happy to have all you captured screen shots provided in .tiff format.
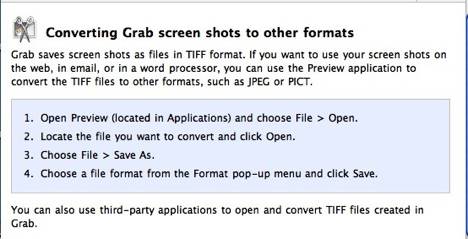

Did you know when using the finder’s command-shift – 4 is used followed by clicking the space bar, you can use this to capture a window? More the camera over the window you want to snap. Click in the camera Icon … done deal.
Finally, if your tire of having you screen shot format defined for you, there’s a freeware tool that allows you to predetermine the formal of all images capture with Apple provided tools. Use ESi’s ScreenShots Plus http://www.ego-systems.com/Products/screenshotsprefpane.html. It’s an application that installs as a system preference. It also you to preselect the format and location of screen shots you take. I’ve selected JPEG and desktop as mine since I can use the obtained screen shots with minimal mousing around to find them. Our Screenshots Preference Pane was written to make these Terminal sessions unnecessary. It allows you to change both the file format of your screenshots as well as where they end up on disk, with just a few clicks of the mouse. And, unlike other utilities, there's no need to log out or restart!
doc_Babad (Unremembered Sources)
§ § § § § § § § § § § § § § § § § §
Exchanging Recipes with Another TheRecipeManager User [v.2.x] — TheRecipeManager [TRM] has a few idiosyncrasies (quirks) that get in the way when one wants to share recipes with another user. There are two potential alternatives. First one can exchange databases. Second, exchange exported recipes (as TRM or text files.)

The first method is somewhat problematical, since the software is not set up to pick and chose an alternate database to read from. The recipe manager stored data (your recipes) in a file called “TRM.df1. That is the only document its works from. [Documents > TheRecipeManager User Data > TRM.df1. So if for example, I want to exchange databases with Dr. Flesher, of the macC Staff, doing so gets a bit tricky. Kelly, the TRM product support person was kind enough to send me a work-around.
TRM always works off the TRM.df1 database file. To access another database, first back up your current data, then do a 'Revert to backup' and select the 'TRM Data (3 APR 06 Backup).df1' which is what I named Erics file. Another available set can also be accessed this way. This makes all of Erics recipes available to me.
To get back to your own data, do a 'Revert to backup' selecting the original backup you made. A revert will replace the data in TRM.df1 with the data in the selected backup file, and you can use this fact to shuttle different data sets in and out, just being careful to first back up the TRM.df1 that's about to be overwritten, if it's changed since the last backup.
Now since I don’t want tall of Eric’s recipes, I have to select the ones I want and export them.
Exporting recipes from TRM either to Text form (you lose graphics) or to TRM’s format is easy. After opening a particular default database in TRM, to export recipes, select the first recipe you want. Shift-click your way through the list grabbing what you like. The export the selected recipes [TRM > File > Export XXX Recipes] Collect the exported recipes folder [Application > TRM > Recipe Exports] and after returning to your personal database, import them into your collection. Alternatively, export all of them and import them all into your collection; then delete any duplicates. No friend, this database isn’t like Apple’s finder, it will allow you to create duplicates (names/files) of a recipe.
doc_Babad
§ § § § § § § § § § § § § § § § § §
Internet Shopping — Keep Your Receipts
Do you have the problem of sorting through too many pieces of paper come tax time or when a problem with some hardware or software arises? To get help you will likely need your purchase receipt. Why not collect these receipts as you buy things, then they’re on your hard drive or its backup.
The next time you buy something online, don't bother to jot down the confirmation number on an easy-to-lose sticky note. If you're using OS X 10.4, press : ?-p when the site displays the receipt. In the Print dialog box that appears, click on PDF and select Save PDF To Web Receipts Folder from the drop-down menu.” Give the receipt a distinctive name, that provided by the supplier may be useless. OS X creates a PDF of your receipt and saves it in your user folder/Documents/Web Receipts. (Alternatively put the receipts wherever else you want them.)”
Hint from Joe Kissell
Modified from Surfing Hints: Surf
Smarter,
MACWORLD October 2006
§ § § § § § § § § § § § § § § § § §
Destroying or Over Burning CD/DVDs– Flattening Warped LP’s — I have a largish number of old data CDs and a few DVDs that contain information I’d rather not have available, even if I tossed them in the cities trash dumpster. So I sent out a help request to both the macC and Mid-Columbia MUG group. I wanted software that over-burned, but was willing to work with a non-software solution if necessary. Oh yes, my shredder handled credit cards but gummed up on CD or DVDs – no I don’t need a new shredder.
 Try these – Pick your favorite
- Brute Force — Put the disk between the door and the frame and firmly close the door. If necessary, bend the disk to break it. The act of doing so will also play havoc on the normal array of bits encoded on the disk.
- Fine Cooking — Put it in the microwave for like 2 seconds It will pretty much screw up anything on there plus the CD looks really cool afterwards. (If you have an old Microwave you don’t use anymore, it would be best. Don’t worry about blowing it up it wont blow up just sparks a little. From Ken Crockett, the Skills of a misspent youth.
- Plain Baking Out the Data — Okay, you’ve read the warning about
leaving CDs and DVD in you car in the summer heat. So make it happen in
your oven, on an old baking sheet, label side down. Set the oven for 250
°F, [120 °C], pop in the disk and have a cup of coffee.
 NOTE: Did you know
the flip side of the methods allows you to recover warped vinyl albums? First,
as with any restoration activity, clean the LP, and then clean it again. Any
dirt will become part of the unwarped disk. You heat the albums, in a preheated
125 °F oven, between 2 panes of glass (cleaner than clean) for five minutes to
flatten out the LP. Just don't get distracted by a ringing phone or wander off
unless you want a LP sized black coaster. It also helps if you have a real
thermometer to verify that 125 °F setting for your oven is really that. Check
out Burn Baby Burn, by Josh McDaniel and Bob Starrett (Peachpit
Press, Review macC August 2004)
NOTE: Did you know
the flip side of the methods allows you to recover warped vinyl albums? First,
as with any restoration activity, clean the LP, and then clean it again. Any
dirt will become part of the unwarped disk. You heat the albums, in a preheated
125 °F oven, between 2 panes of glass (cleaner than clean) for five minutes to
flatten out the LP. Just don't get distracted by a ringing phone or wander off
unless you want a LP sized black coaster. It also helps if you have a real
thermometer to verify that 125 °F setting for your oven is really that. Check
out Burn Baby Burn, by Josh McDaniel and Bob Starrett (Peachpit
Press, Review macC August 2004)
doc_Babad
§ § § § § § § § § § § § § § § § § §
 Make Pasted Text Match in MS Word 2004 — When you, paste text from Web pages
into Word, you'd probably like the pasted text to match the text in your
document. In Word X, select Edit > Paste Special > select Unformatted
Text, and click on OK. This pastes the text without any formatting; it should
therefore pick up the formatting of the location where you pasted it.
Make Pasted Text Match in MS Word 2004 — When you, paste text from Web pages
into Word, you'd probably like the pasted text to match the text in your
document. In Word X, select Edit > Paste Special > select Unformatted
Text, and click on OK. This pastes the text without any formatting; it should
therefore pick up the formatting of the location where you pasted it.
If you use Word 2004, paste the text and then click on the Paste Options button that appears below the pasted text (it looks like a clipboard). Select Match Destination Formatting in the resulting menu.
Kirk McElhearn, Rule the Office MACWORLD October 2006
§ § § § § § § § § § § § § § § § § §
More Easily Save Document Images in MS Word — If your Word 2004 documents contain graphics that you want to use elsewhere, you can drag the images to the desktop or to a folder, but they're saved as picture clippings, which aren't easy to share. Instead, just control-click on an image in a document, select Save As Picture from the contextual menu, and choose a file format from the Format menu.-
Kirk McElhearn, Rule the Office MACWORLD October 2006
§ § § § § § § § § § § § § § § § § §
A Printing Shortcut:
 Question: Back in the good old days, I
could gang-print a number of documents at once from the Finder. Can't I do that
in Mac OS X?
Question: Back in the good old days, I
could gang-print a number of documents at once from the Finder. Can't I do that
in Mac OS X?
Answer: It's still possible if you create a Desktop Printer and drag your files onto its icon. Open Printer Setup Utility (Applications > Utilities) and highlight your printer in the printer list. Then select Printers) Create Desktop Printer, and save it to your desktop. Now you can print many documents at once by just dragging them onto the Desktop Printer's icon on-where else ? - Your desktop.
MacAddict, May 2006, Ask Us Column, Page 60.
§ § § § § § § § § § § § § § § § § §
 What To Do With Your Previously Installed Operating
System — This month's Bug of the
Month isn't a bug, per se, but rather some advice that will help you deal with
future bugs that could pop up after you reinstall Mac OS X. During
installation, you have the option of performing an Archive And Install
operation (click the Options button at the Select A Destination screen).
Archive And Install moves your existing Mac as x System files to a Previous
System folder before it installs a fresh OS.
What To Do With Your Previously Installed Operating
System — This month's Bug of the
Month isn't a bug, per se, but rather some advice that will help you deal with
future bugs that could pop up after you reinstall Mac OS X. During
installation, you have the option of performing an Archive And Install
operation (click the Options button at the Select A Destination screen).
Archive And Install moves your existing Mac as x System files to a Previous
System folder before it installs a fresh OS.
When the installation is finished, a Previous Systems folder appears at the root level of your hard drive, which is required for reverting to an earlier version of as x or for dealing with other issues should your new installation prove problematic. Inside the Previous Systems folder are Library files, user settings, and other system-level folders and files that your previous Mac as x installation used. It also includes Mac as X-installed apps, such as Address Book and Mail. Here's what you should do with your Previous Systems folder:
BACKTRACK Keep this folder around for a week or two after performing your Archive And Install, in case you need to retrieve any preference files. Note that you can't start up using the system files in the Previous Systems folder.
Delete Duplicate Apps — Immediately delete all apps contained in the Previous Systems folder, or you may experience problems with new versions of the same apps stored in the default Applications directory. All you have to do is delete the Applications folder within Previous Systems. Also, delete the duplicate Applications folder before applying the most recent Mac as X combo updater from Apple's Mac as X Downloads Web site (www.apple.com/downloads/macosx/apple).
Bug of the Month MacAddict June 2006, Page 16. MacFixit Column
PS:
After a while, you can actually toss the entire old systems folder on my Tiger Drive; I did so with no Ill effects. However, I have retained on a separate drive my Panther Hard disk and occasionally update the application on the separate drive. doc_Babad
§ § § § § § § § § § § § § § § § § §
URL Contraction and Linking in MS Word —You can, within your MS Word documents use Command K both to create an active link from a typed email address of URL. If preferences in word are set, this is automatic but at time it may not take. Use the manual methods to fix this problem. However, when writing, at times a 2-3 long line link looks just plain dumb. As an alternative use MS Words links creation tools to create an active link associated with a person’s name of other text.
----------------
Adam Pratt_ in an
Becomes: Adam Pratt _ in an amozon.com review…
Links can also be used to navigate between sections of large documents, but that’s another tip.
doc_Babad and perhaps another unremembered source.
§ § § § § § § § § § § § § § § § § §
Managing Your Widgets — There are hundreds of widgets available for download from the Apple website (www.apple.com/downloads/dashboard). Unfortunately for the frequent widget downloader, your Widget Bar in Dashboard can quickly become cluttered with once-used widgets since you can’t completely remove these unwanted widgets while in Dashboard.
To get rid of these unwanted widgets, you’ll need to know a little about how and where widgets are installed. A widget can be installed in two ways, as a system-wide widget, available to every user on your Mac, or as a user-specific widget. To remove a system-wide widget, simply go to the Library > Widgets folder (accessible to you if you have Admin level access) and move the widget(s) to the trash. To remove a user-specific widget, go to “your name” folder > Library > Widgets and move the widget(s) to the trash.
macHOME HotTips www.machome.com
From Paul Taylor's Hints&Tips column January 2007
§ § § § § § § § § § § § § § § § § §
See you next month!
Harry {doc} Babad